Introduction to SDL | SDL Lesson 1
In this lesson, you will learn what SDL is, how to setup an SDL repository, how to create a window, and how to draw to that window. Let's get started!
If you don't have Visual Studio Code instaleled and setup with MinGW, it is REQUIRED for this lesson. You can find the tutorial here >
What is SDL?
Simple DirectMedia Layer is a free, open source library that gives you access to your computer's graphics, audio, input (like keyboards, mice and controllers), and more in a way that's great for building games or apps. Think of SDL like a toolbelt for a builder. It gives you the hammers, measuring tapes and cement for you to build things like houses (your games and apps). You still have to put everything together yourself, but you have all the basic tools ready to go. This is different from using something like OpenGL, where it's like being told to build a house but you also have to make your own hammer and saw before you can even start. SDL saves you tons of time by providing ready-to-use building blocks.
Creating the Repository
The first and most important step to getting started with SDL is setting up your repository. A repository is basically just the root (or main) folder where all of your assets, files and code will go. To do this, open your file explorer, navigate to where you would like your project to be located and create a new folder named sdl-template.
But we can't start coding just yet. Inside your repository folder, create 4 new folders: resources, include, lib, and src. These folders will hold your game assets (like pictures, videos, textures, etc.), header files, libraries, and source code.
Now it's time to add SDL to our project. In this tutorial, we will be using SDL v3.2.10, but any version of SDL newer than v3.0.0 will work. Visit SDL's GitHub page and download the file called SDL3-devel-3.2.10-mingw.tar.gz (or the version you are using). Save it into your repository and extract the file there.
Before we can continue, we must check what type of system our computer is using. If you add the wrong files, your project will not work. To check your system type, open Settings and go to System > About > Device Specifications > System Type.
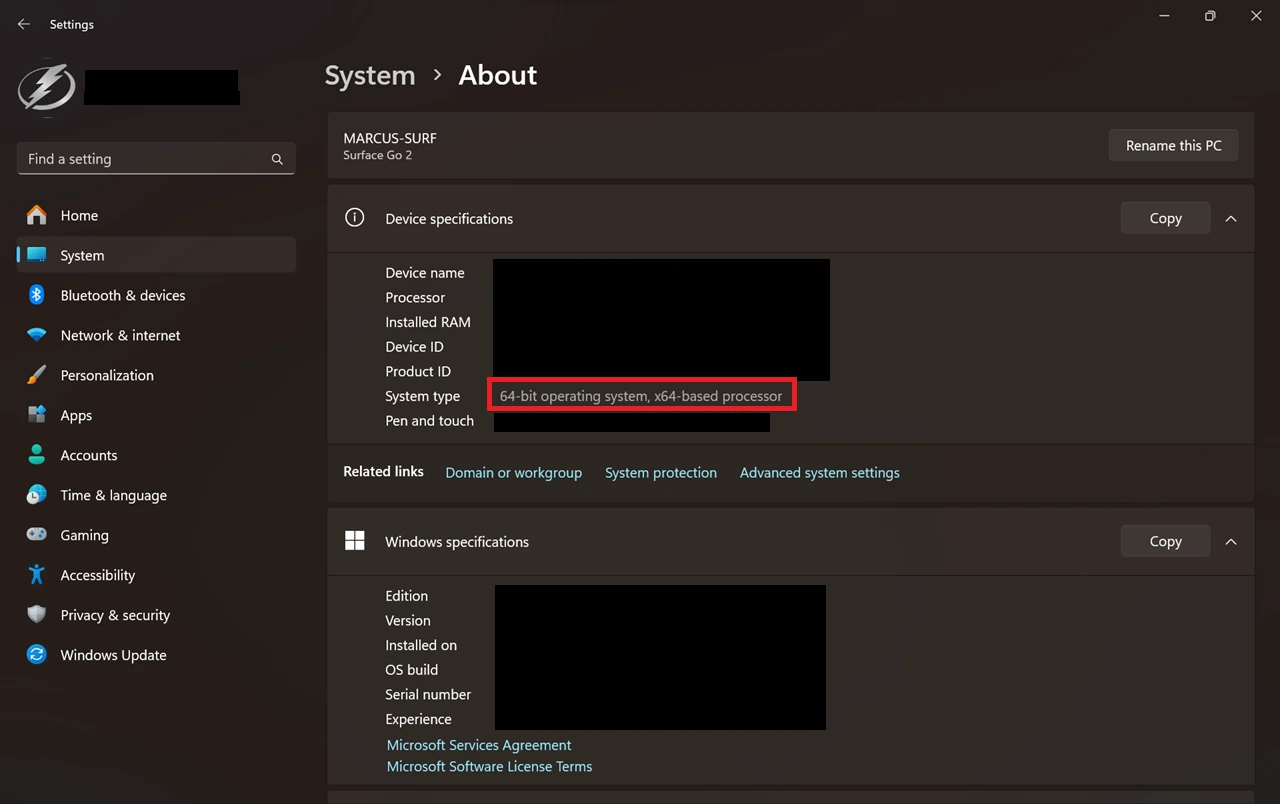
Depending on your system type, you will need to use the matching SDL folder.
i686-w64-mingw32for 32-bit systemsx86_64-w64-mingw32for 64-bit systems
If you are unsure about your system type, choose 32-bit. It usually works for both.
We are only interested in three folders.
- Copy the
includefolder into your project root. - Copy the
libfolder into your project root. - Inside the
binfolder, copy theSDL3.dllfile into your project root.
After you have done this, you can delete the original tar.gz file and the extracted folder.
Now it's time to get programming! Open your project folder with Visual Studio Code. Inside the src folder, create a new file called main.c. Let's start by writing a simple "Hello, World!" program:
#include <stdio.h>
int main() {
	printf("Hello, World!\n");
	return 0;
}
You could click the play button at the top right of VSCode to run this script, but because we need to link the SDL files properly, we will use a Makefile instead. A Makefile is a file that tells the computer how to compile the project using all the files we set up earlier.
In the root of your project, create a new file called Makefile and open it up. We will define three commands:
build- to compile the projectrun- to run the projectcompile- to build and then run the project together
Here is the basic Makefile for now:
compile: build run
build:
	g++ -g -I include -L lib -o main src/main.c -lSDL3
run:
	./main.exe
Now, open up a new terminal (Ctrl+Shift+'), and try entering the command line mingw32-make. Notice how it automatically creates a main.exe file and runs it? Your project is now linked with SDL! So now we get to the exciting part, time to start creating our first SDL window!
Creating the Window
We can start by deleting all the code inside your main.c file. We're going to start fresh and set things up properly. The first thing we need to do is include the header file that we added earlier. Although we've already linked SDL during compilation, we also need to include the header in our source code so the compiler knows where to find the function definitions. To do this, add the following line at the very top of your file: #include <SDL3/sdl.h>
Now that SDL is included, we need to write our main function. When using SDL, the main function must follow a very specific format for it to work properly. You must include the two arguments int argc and char* argv[]. After that, there are a few important setup steps we need to take:
- First we need to initialize SDL for video rendering. We do this by calling
SDL_Init(SDL_INIT_VIDEO);. This function takes a flag as an argument telling SDL what systems we want to initialize. In this case, we passSDL_INIT_VIDEObecause we want to use SDL's video (rendering) features. - Next we create the window. We do this using
SDL_CreateWindow("sdl-template", 800, 600, SDL_WINDOW_OPENGL);. This function takes four arguments:- The title of the window (a string inside quotes).
- The window width (in pixels).
- The window height (in pixels).
- The window flags (we'll use
SDL_WINDOW_OPENGLto allow OpenGL rendering).
- After creating the window, we need a renderer to actually draw things on the screen. We create it with
renderer = SDL_CreateRenderer(window, NULL);. This attaches a rendering context to our window. We only need to give itthe window for now and the second argument, driver index, can stay asNULLto let SDL choose the best option automatically. - Then we et the render scale. We use
SDL_SetRenderScale(renderer, 1, 1);to set the size of each pixel. The arguments are:- The renderer we want to affect.
- The horizontal scale (set to 1 -> normal size).
- The vertical scale (also 1 -> normal size).
- And finally, to set the blend mode, we call
SDL_SetRenderDrawBlendMode(renderer, SDL_BLENDMODE_BLEND);. This allows the renderer to support transparency and overlapping objects with smooth blending, instead of weird jagged overlaps.
Before all of this, we also need to declare the window and renderer objects. These go at the top of your file, under the header include, and outside of the main function. By the end of this step, your full code should look like this:
#include <SDL3/SDL.h>
#include <stdio.h>

SDL_Window* window;
SDL_Renderer* renderer;
SDL_Event event;

int main(int argc, char* argv[]) {

	SDL_Init(SDL_INIT_VIDEO);
	window = SDL_CreateWindow("main", 800, 600, SDL_WINDOW_OPENGL);
	renderer = SDL_CreateRenderer(window, NULL);
	SDL_SetRenderScale(renderer, 1, 1);
	SDL_SetRenderDrawBlendMode(renderer, SDL_BLENDMODE_BLEND);

	return 0;
}
Try running the project now!
That's because after setting everything up, the program immediately reaches return 0; and exits. To fix this, we need to create something called a game loop. The game loop is a loop that keeps running while the game is active. It handles everything from drawing to input events and it only ends when the player closes the game. This is how we build it:
First, inside the main function, we create a new variable called bool running and set it to true. This variable will control whether the game keeps running. Then we add a while loop that checks if running is still true.
Inside the loop, we check for events, like if the user clicked the close button, using SDL_PollEvent(). If we detect an event of type SDL_EVENT_QUIT, we set running to false to break out of the loop and close the window.
bool running = true;
SDL_Event event;
while (running) {
	while (SDL_PollEvent(&event) != 0) {
		if (event.type == SDL_EVENT_QUIT) running = false;
	}
	// run loop code here
}
Now try running the code!
If you're stuck or something isn't working, you can view the source code >
Drawing on the Window
You don't just want a window with a blank screen? Remember the renderer from earlier attached to the window, this is what we will draw on and then push it to the window to render it on the screen. To draw we will need to first set the color of what we are drawing with SDL_RenderSetColor();, and then do one of the four most common drawing functions:
SDL_RenderClear();
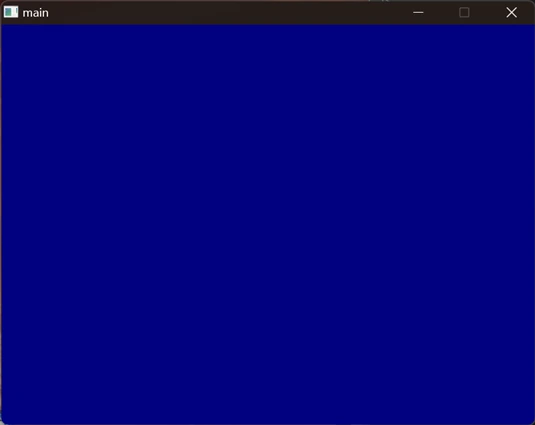
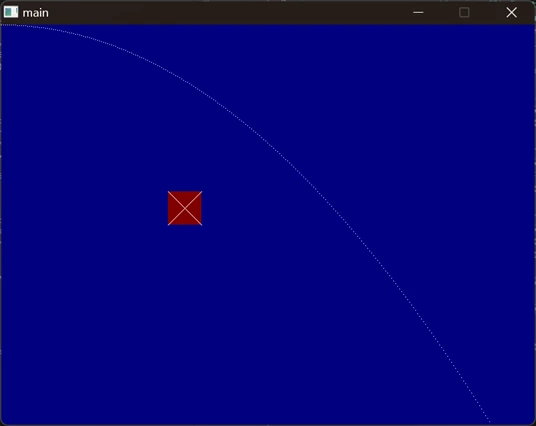
This function basically sets the entire screen to a single color. So let's change the screen to a color a little bit more colorful, let's try a navy blue. To do this, we first have to set the draw color. This function takes in five arguments: a render object, values for r, g, b and a transparency value. Now let's use SDL_RenderClear() and set the background to our color. Let's use rgba(0, 0, 128, 255).
Dont forget to include SDL_RenderPresent(renderer); to push the contents of the renderer to the window otherwise your window will just be a black screen!
SDL_SetRenderDrawColor(renderer, 0, 0, 128, 255);
SDL_RenderClear(renderer);

SDL_RenderPresent(renderer); // pushes renderer content to the window
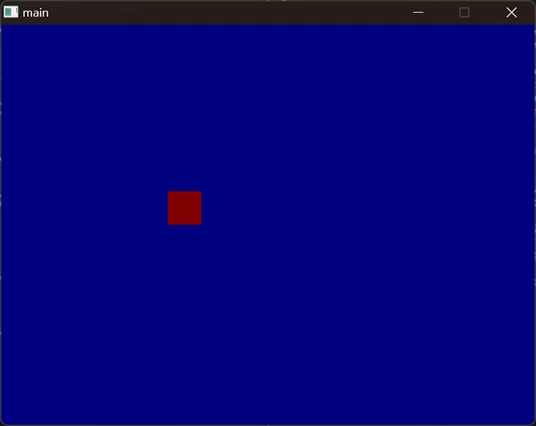
SDL_RenderFillRect()
Now let's try drawing a rectangle in the center off the screen. To do this we use the SDL_RenderFillRect() function. This function takes in arguments for a renderer and an SDL_FRect object. Let's make it a red square. The most important thing here is the FRect object. To initialize it, we need to give it an x, y, width, and height value. SDL is a little strange in that the top left corner of the screen is the coordinate (0, 0), but as you go downward, the y-coordinate gets larger. So, when you render something, it may seem flipped vertically. Let's make a 50x50 pixel square at (250, 250). We'll use the color rgba(255, 0, 0, 255).
SDL_SetRenderDrawColor(renderer, 255, 0, 0, 255);
SDL_FRect rect = {250.0f, 250.0f, 50.0f, 50.0f};
SDL_RenderFillRect(renderer, &rect);
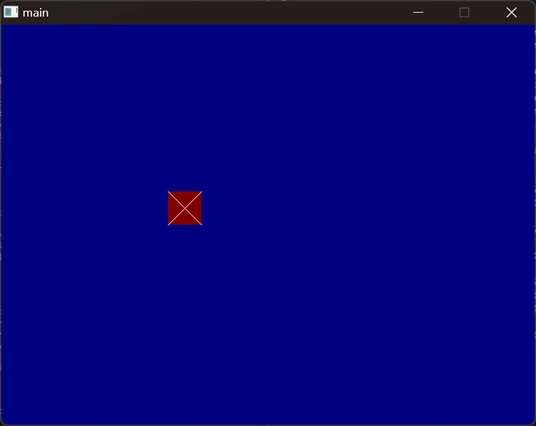
SDL_RenderLine();
Now let's say we wanted to draw a line to trace the outline of an object, we would use SDL_RenderLine(). This function takes five arguments: one for the renderer, two for the x and y position of the first point, and two for the x and y position of the second point. Let's try drawing a white cross with two lines inside the box we just made. We'll use rgba(255, 255, 255, 255).
SDL_SetRenderDrawColor(renderer, 255, 255, 255, 255);
SDL_RenderLine(renderer, 250.0f+50.0f, 250.0f, 250.0f, 250.0f+50.0f);
SDL_RenderLine(renderer, 250.0f+50.0f, 250.0f+50.0f, 250.0f, 250.0f);
SDL_RenderPoint();
This function is not commonly used except for in raycasting projects or ones that have very small particles. Usually, we use this to draw circles and other inorganic shapes using sin and cos. This function just takes a renderer, an x, and a y position, and draws a singular pixel at that position on the screen. Using your knowledge of for loops, try drawing a curved line with this function.
// Here is what I came up with

SDL_SetRenderDrawColor(renderer, 255, 255, 255, 255);
for (float i = 0; i > 600; i+=0.1) {
	SDL_RenderPoint(renderer, i*30, (i*i));
}
If you need help or are stuck, you can view the source code >.
Don't forget that your code will draw in the order of functions you put them in, so be careful you aren't overwriting any of the objects you draw because they are in the wrong order!
For the full repository we made in this lesson, you can visit the repository on github >
Excercies:
- EASY: Try to make a triangle with 3
SDL_RenderLine() functions. View Solution.
- DIFFICULT: Try to create an empty circle using
SDL_RenderPoint() and the math.h header file. View Solution.
SDL_RenderLine() functions. View Solution.SDL_RenderPoint() and the math.h header file. View Solution.