Textures and Delta Time | SDL Lesson 2
In this lesson, you will learn about Delta Time, how to setup SDL_Image, load images onto the window and finalize your SDL Template. Let's get started!
If you don't have Visual Studio Code installed and setup with MinGW, it is REQUIRED for this lesson. You can find the tutorial here >
You can find the source code for the repository made in the previous lesson here >
What is SDL Image?
SDL_image is an extension library for SDL that makes it super easy to load image files like PNGs and JPGs into your game or app. While basic SDL can only handle BMP files (which are huge and outdated), SDL_image gives you the power to use modern image formats, meaning you can drop high-quality assets into your project with just a single function call. It works like an image translator: you feed it a file path, and it hands you back a texture that SDL can actually use on the screen. This saves you from writing your own custom image parser and keeps things simple, fast, and game-ready.
How to Add SDL Image to your Repository
The first step to rendering textures in SDL is to add SDL_image to our repository. Visit the SDL_image GitHub page and download the file called SDL3_image-devel-3.2.4-mingw.tar.gz. Save it into the root of your repository and extract the file there. Do you remember how to check what type of system your computer uses (either 32 or 64-bit)? If you are not sure how, go back and learn how to check your system type. We will again have to use the matching SDL_image folder for it to work:
i686-w64-mingw32for 32-bit systemsx86_64-w64-mingw32for 64-bit systems
We are again only interested in three folders:
- Copy the
includefolder into your project root. - Copy the
libfolder into your project root. - Inside the
binfolder, copy theSDL3_image.dllfile into your project root.
Now we have to link the SDL_image.dll to our project, so at the end of the build command on our Makefile, add a new reference to -lSDL3_image. And finally, we need to include the SDL_image header file in the main.c, so we will add the include #include <SDL3_image/SDL_image.h> (make sure you put it AFTER the SDL.h include). Notice how linking SDL_image had excactly the same process as linking SDL like we did in the last lesson. This is how you link any header files you may get in the future.
You can now delete all the other drawing functions we used in the last lesson from the game loop (we will keep the Poll EVent loop and the RenderPresent function) and delete the original tar.gz file and its extracted folder.
Your current main.c file should look like this:
#include <SDL3/SDL.h>
#include <SDL3_image/SDL_image.h>
#include <stdio.h>

SDL_Window* window;
SDL_Renderer* renderer;

int main(int argc, char* argv[]) {

	SDL_Init(SDL_INIT_VIDEO);
	window = SDL_CreateWindow("main", 800, 600, SDL_WINDOW_OPENGL);
	renderer = SDL_CreateRenderer(window, NULL);
	SDL_SetRenderScale(renderer, 1, 1);
	SDL_SetRenderDrawBlendMode(renderer, SDL_BLENDMODE_BLEND);

	bool running = true;
	SDL_Event event;
	while (running) {
		while (SDL_PollEvent(&event) != 0) {
			if (event.type == SDL_EVENT_QUIT) running = false;
		}

		SDL_RenderPresent(renderer);
	}

	return 0;
}
How to Render a Texture
The first step we need to do when rendering a texture is to actually load it in. To do this we will make our own function. Above your main function make a new bool function called load_textures(). In this function, we will load images to thier own textures.
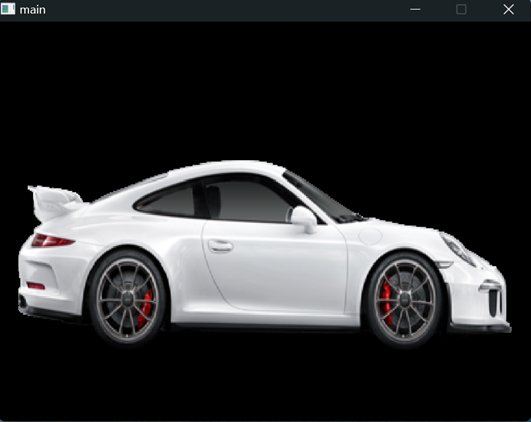
For each texture you want to load, you will add a new SDL_Texture* object. Lets make a new texture with this Car image. Download the image and put it in your resources folder, then in your main file, make a new texture with SDL_Texture* car_texture;.
Next, we actually have to link the image to the texture. In our new "load_textures" function we will attach our image using its path to the texture. We will do this with car_texture = IMG_LoadTexture(renderer, "./resources/car.png");. This IMG_LoadTexture function takes arguments for the renderer you use it on and also the path to your image. Make sure to use your "load_textures" function after we initialize SDL in the main function as well.
Your load textures function should now look something like this:
// The place our car texture will go
SDL_Texture* car_texture;

bool load_textures() {

	// Loading our car texture
	car_texture = IMG_LoadTexture(renderer, "./resources/car.png");

	return true;
}

// dont forget to include the texture loading function in the main function
load_textures();
In the "load_textures" function, after you link an image to the function, you can also set the scalemode to NEAREST, which stops the individual pictures of the image from blending together, making it better for pixel art images. We do this with SDL_SetTextureScaleMode(car_texture, SDL_SCALEMODE_NEAREST);
Our new car texture is setup, but now we have to get it onto our window. Back in the main function, inside the game loop, we will have to make a special object with a position and dimensions and then render a texture on top of it. Just like when we made the red box in the last lesson, we will use an SDL_FRect object to set our textures position. We are going to make our texture take up the whole screen, so we will use the position (0, 0) with height = 600 and width = 800. Try setting up this SDL_FRect by yourself.
Now all thats left to do is to place our texture at that position, on the renderer. We do this with SDL_RendererTexture(renderer, car_texture, NULL, &position); which takes arguments for the renderer, texture, the src position (which we won't go into right now), and then a reference to the position. We use a reference for the position becasue we are actually taking the information out of the object. Our final code should look something like this:
// put texture on the renderer
SDL_FRect position = {0, 0, 800, 600};
SDL_RendererTexture(renderer, car_texture, NULL, &position);

SDL_RenderPresent(renderer);
If you're stuck or something isn't working, you can view the source code here >
Now lets make our image smaller and make it move from the left to the right accross the screen. We will use a variable to track the car's x position on the window and increase it every frame and then use that variable as the x value in our textures FRect SDL_FRect position1 = {x, 0, 80, 60};. Before every frame is rendered, we also have to clear the original cntents of the window as we are no longer just presenting a static image, and we do this with SDL_RenderClear(renderer);.
// initialize the car's x variable
float x = 0;

// clear the renderer
SDL_RenderClear(renderer);

// update the FRect size and add the x variable
SDL_FRect position = {x, 0, 80, 60};

// update the x position (in the game loop)
x = x + 1; // also can be written as x+=1;
This works fine, but the speed of your player is completely dependent on the framerate of your program. Think of it like this: you ask Timmy and Jimmy to test your game. Timmy's computer runs the game at 60 frames per second (fps), while Jimmy's runs it at 30fps. They both play the game, but Timmy's character moves twice as fast as Jimmy's. Why? Because the character's movement is tied directly to how many frames are being drawn. The more frames, the more movement happens. So Timmy, getting 60 updates per second, moves more often than Jimmy, who only gets 30 updates per second. This makes the game feel unfair and inconsistent across devices. To fix this, we use something called delta time.
What is Delta Time?
When we measure the amount of time between frames, we get the delta time. This Delta Time (often written as dt or deltaTime in code) tells us how long it took to render the last frame, usually measured in seconds or milliseconds. So for example, if your game is running at 60fps, delta time would be about 0.016 seconds per frame (because 1 divided by 60 is roughly 0.016). If it's running at 30fps, delta time would be around 0.033. This number becomes super useful when we want to make things move at the same speed no matter what the frame rate is.
Instead of saying “move the player 5 units every frame,” which is tied to the frame rate, we say “move the player at 300 units per second” and multiply that speed by delta time each frame. For example, position += speed * dt;. If speed is 300 and dt is 0.016, then we move 4.8 units that frame. If the frame took longer and dt is 0.033, we move 9.9 units that frame. It may seem like more, but remember: fewer frames are being drawn per second, so we move more per frame to make up for it. In both cases, the character ends up moving at the same rate per second. This keeps movement, physics, and animation timing smooth and consistent on all devices and frame rates.
So how do we get the delta time? To calculate it, we need to know how much time has passed between the last frame and the current one. In C, we can do this using the clock() function from the <time.h> library. Let me explain what’s going on in the code below:
#include <time.h> // to get the current time
#include <unistd.h> // for usleep() -> control_fps function

// These variables help us calculate delta time
clock_t previous_time = 0; // stores the time from the last frame
float dt; // will hold the final delta time in seconds

// Function to calculate delta time
// Returns how many seconds passed since the last frame
// Call this once per frame before any movement updates
float get_delta_time() {
    clock_t current_time = clock(); // gives us the number of CPU clock ticks since the program started
    float delta_time = (float)(current_time - previous_time) / CLOCKS_PER_SEC;
	// CLOCKS_PER_SEC is a constant that tells us how many ticks are in one second
	// dividing the difference in ticks by CLOCKS_PER_SEC, we get the time passed between frames (the delta time)
    previous_time = current_time; // save the current time to previous_time so that next frame we can compare it again
    return delta_time;
}

// Function to control the framerate manually
// It delays the next frame until the correct frame time has passed
// keeps your game from running too fast
void control_fps(float target_fps) {
	// Calculate how long each frame should take (in seconds)
	float frame_duration = 1.0f / target_fps;

	// Get the current time at the end of the frame
	clock_t now = clock();

	// Calculate how much time has passed since the frame started
	float elapsed = (float)(now - previous_time) / CLOCKS_PER_SEC;

	// Find out how much time is left to wait to match the desired frame duration
	float remaining_time = frame_duration - elapsed;

	// If the frame finished faster than the desired duration, sleep for the remaining time
	if (remaining_time > 0) {
		// Convert seconds to microseconds and sleep (pause) for that duration
		usleep((useconds_t)(remaining_time * 1000000.0f));
	}
}

// Example usage each frame:
dt = get_delta_time();    // get how long the last frame took (at start of the frame)
control_fps(120.0f);      // limit FPS to 120 (at end of the frame)
And now, if we change our character's position by 25 * dt, it will move smoothly and at the same speed across all devices. x+=25*dt;
If you're stuck or something isn't working, you can view the source code here >
For the full repository we made in this lesson, you can visit the repository on github >
You can also click here for the newest template for an SDL project.